 ALT: Logos for R, devtools and Rstudio
Table of Contents
This is a tutorial on how to create a bare-bones R package. The tutorial was developed for a JDI Open seminar.
The tutorial draws heavily from the “The whole game” chapter in the R Packages book by Hadley Wickham and Jenny Bryan. Please consult that book for further details and to learn more about package development with R.
What are packages?
Packages allow distributing custom code that extend the basic capabilities and functionalities of programming languages. The use of packages (or modules) is part of a software design philosophy called “modular programming”:
Modular programming is a software design technique that emphasizes separating the functionality of a program into independent, interchangeable modules, such that each contains everything necessary to execute only one aspect of the desired functionality. –Wikipedia
Packages are a core element of a researchers toolbox as they implement many specific functions and analysis techniques not available in default installations of R or python, for example.
Why should you develop packages?
While package development may sound like something only software developers do, there are at least three good reasons why researchers and scientists may want to develop packages.
1. Develop new research methods and tools
Computers are a fundamental part of modern science and research, so it makes sense for many research projects to involve developing research software. If you develop a new algorithm, modelling technique, or a tool that facilitates research, it makes sense to distribute your code as a package so that other scientists and researchers can use your tools in their research.
2. To share reproducible research
Though packages are often used to distribute code that other researchers can use in their projects, they are an ideal solution to share what Marwick et al. (2018) call research compendia that wrap your articles' data, materials and reproducibility scripts.
In addition to adhering to open science principles, research projects with open data and materials get more citations and tend to lead to more publications.
3. To make your life easier
Bundling your functions into a package can make your life easier, even if you don’t plan to share your code with anyone else but yourself. The more you use R (or another similar language), it’s likely you’ll start using custom functions to make repetitive tasks easier.
"I wish I'd left this code across scattered .R files instead of combining it into a package" said no one ever #rstats http://t.co/udeNH4T67H
— David Robinson (@drob) June 19, 2015
Rather than copying these into every new project folder, or having scattered files across multiple computers, writing a package offers a convenient way to ensure your custom functions are available system-wide.
If you work on several computers or rely on servers to run some of your analysis, using packages makes sharing your functions across your even more seamless, and reduces the chances of making a mistake (e.g. by using an outdated function).
Before we start
You don’t need to be an R expert to be able to follow the tutorial. But you do need to be at least little familiar with R (or a similar scripting language, such as Python). The bare minimum you need to know is how to install R packages, and how to write a function.
Software
You also need some software installed. First you need an installation of R (obviously). While you do not need Rstudio, it makes writing packages (and working with R in general) much easier. So install a recent version of Rstudio.
Because we will be building R packages from scratch (compiling in computer parlance), you will need a compiler.
- On Windows you need to install Rtools.
- On macOS you need to install Xcode (though it is easier to install via the Mac App Store)
- On Linux, the compiler you need will depend on your system, for Ubuntu-based you can install the
r-base-devpackage.
R packages
On R, you will need the following packages to make packages:
devtoolsroxygen2testthatknitr
You can install them with this command:
install.packages(c("devtools", "roxygen2", "testthat", "knitr"))
To check if everything is installed correctly, open an R/Rstudio session and run the following command. You should get the message shown if everything was set up correctly.
devtools::has_devel()
#> Your system is ready to build packages!
(Console output blocks begin with #> to distinguish from code.)
Git and Github
This is not required to create R packages, but it is highly recommended.
Git is a version control software widely used to develop software. It is used by solo developers and major corporations alike.
Git should already be installed in macOS and Linux, but you need to install it if you are using Windows.
Github is a major online platform where you can store git repositories. It has free plans as well as free education plans with extra features. Github is great for developing projects collaboratively, and in the context of R package development, it can be used to share your package to anyone with an internet connection.
Tutorial
Set up
Open a new Rstudio session and create a new project in a suitable directory (File>New Project). We will call our package toypackage but you can choose any name you want.

Now load the devtools package.
# Load devtools and friends

library(devtools)
Next we use the create_package function to create the basic file structure of the package. At their essence, R packages are nothing more than directories (folders) and text files structured according to some rules and conventions.
# Create the file structure
create_package("~/projects/packages/toypackage") ## write the path to your WD
In the R console, you will be asked to overwrite the toypackage.Rproj file, say yes. A new Rstudio instance will open. You can close your old session and work on the new one. You will need to re-load the devtools package.
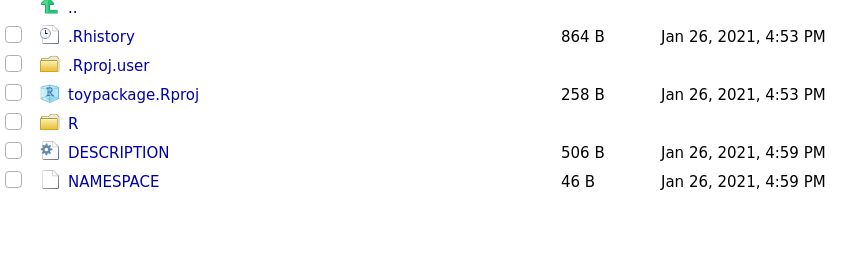
After running create_package you will note some new files and directories were created in your working directory. For now, don’t touch them, we will be working with them soon.
We are now going to initialise a git repository. You could do this directly in the terminal if you are more comfortable doing that, but we will use the use_git command. You will be asked if you want to commit existing files, answer yes. You will be asked to restart Rstudio, say yes (and re-load the devtools package).
use_git()
Write a function
We are now ready to start writing functions. Functions are the main component of your R package. In a way, you can think of an R package as a delivery system for functions. You can achieve many great things using R functions, but sometimes you need more powerful code written in another language (such as C or C#). This is known as compiled code, and I’m not going to cover this as it’s an area I have not explored yet.
The functions you write will live in an Rscript file (a file that ends in .R). Your function files will be stored in the R/ directory. Don’t place any other files there. While you can have more than one function per file, a common convention is to use only one function per file.
We let devtools create the file for us with the use_r fuction:
use_r("hello") # Will create a file called R/hello.R
The use_r code will create a new file inside R/ called hello.R. Copy this code into the file and save.
 hello <- function(name){
   message <- paste0("Hello ", name, "!")

   return(message)
 }
This is a very simple function that prints Hello + name.
To test your new function, you could source that file, but this would add it to your environment as an object. To better mimic how the function would work if you actually loaded a package, use the load_all function. You can then run your function and you should get the following result.
load_all()
hello("Patricio")
#> [1] "Hello Patricio!"
Now commit your changes using the Git panel or the terminal (it is a good idea to commit your changes often).
Check everything works
R has an integrated mechanism to check whether everything in your package is working correctly. We can run this using the check function.
check()
You should get a lot of output in the console. At the end you will see the results of the check. You should get one warning regarding the license.
#> ─── R CMD check results ─────────────────────── toypackage 0.0.0.9000 ────
#> Duration: 7.1s
#>
#> > checking DESCRIPTION meta-information ... WARNING
#>   Non-standard license specification:
#>     `use_mit_license()`, `use_gpl3_license()` or friends to pick a
#>     license
#>   Standardizable: FALSE
#>
#> 0 errors ✓ | 1 warning x | 0 notes
However, before fixing the license warning, we will update the DESCRIPTION file.
DESCRIPTION file
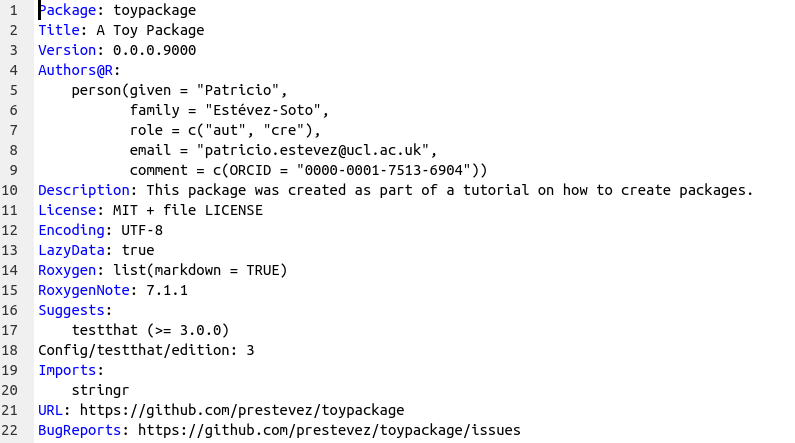
The DESCRIPTION file is one of the most important files in the R package, it is there to summarise the main information about the package and it is what tells R that this directory is a package.
When you open it, you will see a template with some information. Update the Title, Author and Description fields. (Don’t worry about the other fields you see, they will be updated automatically later.)
Next we add the license information using the use_mit_license function. If you want to use another license run ?use_mit_license to see the available licenses.
use_mit_license("Patricio R Estévez-Soto")
Documentation
Documentation is one of the most important aspects of a package. It is the information that is displayed when you run help(x) or ?x. They tell others (and future you) what your function does and how to use it. You could write your documentation manually, but …
ALT: A meme of a woman saying 'Ain't nobody got time for that!' via GIPHY
So instead, we use the roxygen2 package to automatically create documentation for our functions.
To do this, open hello.R, place the cursor inside the function, and click on Code>Insert Roxygen Skeleton. You will see new lines of code starting with #'. These lines are special comments that are ‘read’ by the document function to create the documentation files. Edit the information on the hello.R file to something like this:
#' hello
#'
#' @param name A name
#'
#' @return A message
#' @export
#'
#' @examples hello("Alice")
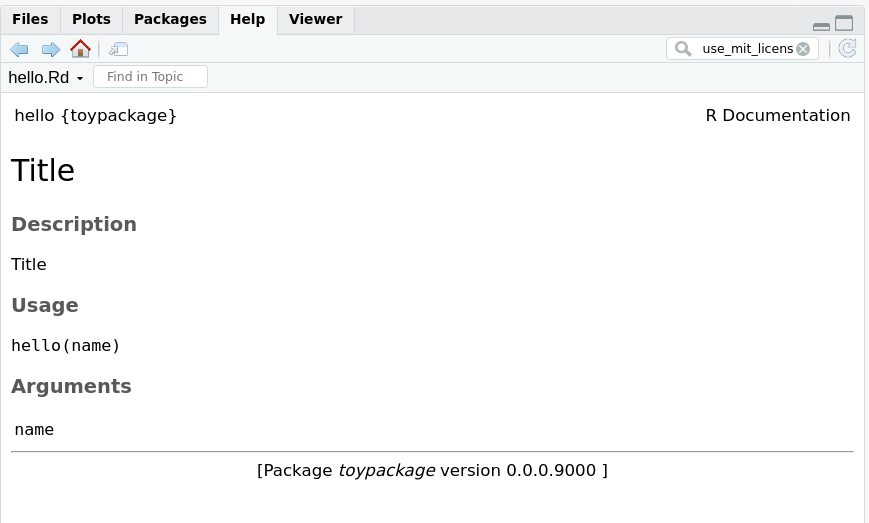
Save the file and run the document function. If you then run ?hello, you should get the function’s documentation in Rstudio’s Help viewer
document()
?hello
You will also see that the document function created the NAMESPACE file. This file is important because it tells R which functions will be available to the user. Don’t edit this by hand, as document takes care of that. To make sure your function is available in the NAMESPACE, include the @export parameter in the function. It makes sense to export most functions, though sometimes you want to ‘hide’ functions that are only used within other functions.
We now re-run the check command to make sure everything is working correctly. You should get not errors, warnings or notes.
check()
#> ── R CMD check results ─── toypackage 0.0.0.9000 ────
#> Duration: 9s
#>
#> 0 errors ✓ | 0 warnings ✓ | 0 notes ✓
#>
A minimally working package
Your package can now be installed. You install your package with the install function (duh). This will make your functions available to your system. You can test if it worked by opening a new R session in another window and loading the package and running the hello function.
install()

#> ✓  checking for file ‘/home/prestevez/projects/packages/toypackage/DESCRIPTION’ ...
#> ─  preparing ‘toypackage’:
#> ✓  checking DESCRIPTION meta-information ...
#> ─  checking for LF line-endings in source and make files and shell scripts
#> ─  checking for empty or unneeded directories
#> ─  building ‘toypackage_0.0.0.9000.tar.gz’
#>
#> Running /usr/lib/R/bin/R CMD INSTALL /tmp/RtmpONCeyy/toypackage_0.0.0.9000.tar.gz --install-tests
#> * installing to library ‘/home/prestevez/R/x86_64-pc-linux-gnu-library/4.0’
#> * installing *source* package ‘toypackage’ ...
#> ** using staged installation
#> ** R
#> ** byte-compile and prepare package for lazy loading
#> ** help
#> *** installing help indices
#> ** building package indices
#> ** testing if installed package can be loaded from temporary location
#> ** testing if installed package can be loaded from final location
#> ** testing if installed package keeps a record of temporary installation path
#> * DONE (toypackage)
Tests
This section is about writing tests to verify that your functions work correctly. Tests are not strictly necessary, but it is very good practice to test your functions.
The testthat package makes it very easy to add built-in tests to your package. By calling the use_testthat function we add testthat to the package dependencies (more on that later), as well as create the directories and files for our tests.
use_testthat()
It is up to you to write meaningful tests for your functions. Here we will write a simple test for the hello function. We create the test file for hello using the use_test function.
use_test("hello") # creates tests/testthat/test-hello.R
Then edit the new file and write the following:
test_that("hello works", {
  test_name <- "Alice"
  test_message <- paste0("Hello ", test_name, "!")

  expect_identical(test_message, hello(test_name))
})
Now run the test function and see if your functions pass your tests.
test()

#> Testing toypackage
#> ✓ |  OK F W S | Context
#> ✓ |   1       | hello [0.1s]
#>
#> ══ Results ════════════════════════════
#> Duration: 0.1 s
#>
#> [ FAIL 0 | WARN 0 | SKIP 0 | PASS 1 ]
Importing functions from another package
Just because you can write functions it doesn’t mean you always should. If a function from another package suits your needs, it makes more sense to use that instead of developing your own function.
There are two steps to using functions from another package in your packaged functions.
First, you must add the package to your dependencies so that when a user installs your package it also installs the package your package depends on (if it’s not installed already). You do this using the use_package function.
In this example, we’ll be using a function from the stringr package.
use_package("stringr")
Then, to use a function from stringr in your function, you call it in your code using this syntax stringr::the_function().
We create a new function file with use_r.
use_r("greetings")
And write the following code in the file.
#' greeting
#'
#' @param many_names Several names
#'
#' @return A greeting
#' @export
#'
#' @examples greetings(c("Alice", "Bob"))
greetings <- function(many_names){
  the_greetings <- stringr::str_c("Greetings ", many_names, ".")

  return(the_greetings)
}
Now document your function and run load_all to test it.
document()

greetings(c("Alice", "Bob"))
#> [1] "Greetings Alice."  "Greetings Bob."
Use Github
By now you could install your toypackage in your system and call it day. But we will now see how to publish our package on Github. This is not necessary to make your package work, but it is a great tool if you ever want anyone else to use your package (or even to install it in a different computer).
We can automatically create a Github repository from R using the use_github function. (Make sure you have committed all the changes in the repo.)
# Use this command if you have SSH keys associated with Github
use_github(protocol = "ssh")

# Use this command if you don't
use_github()
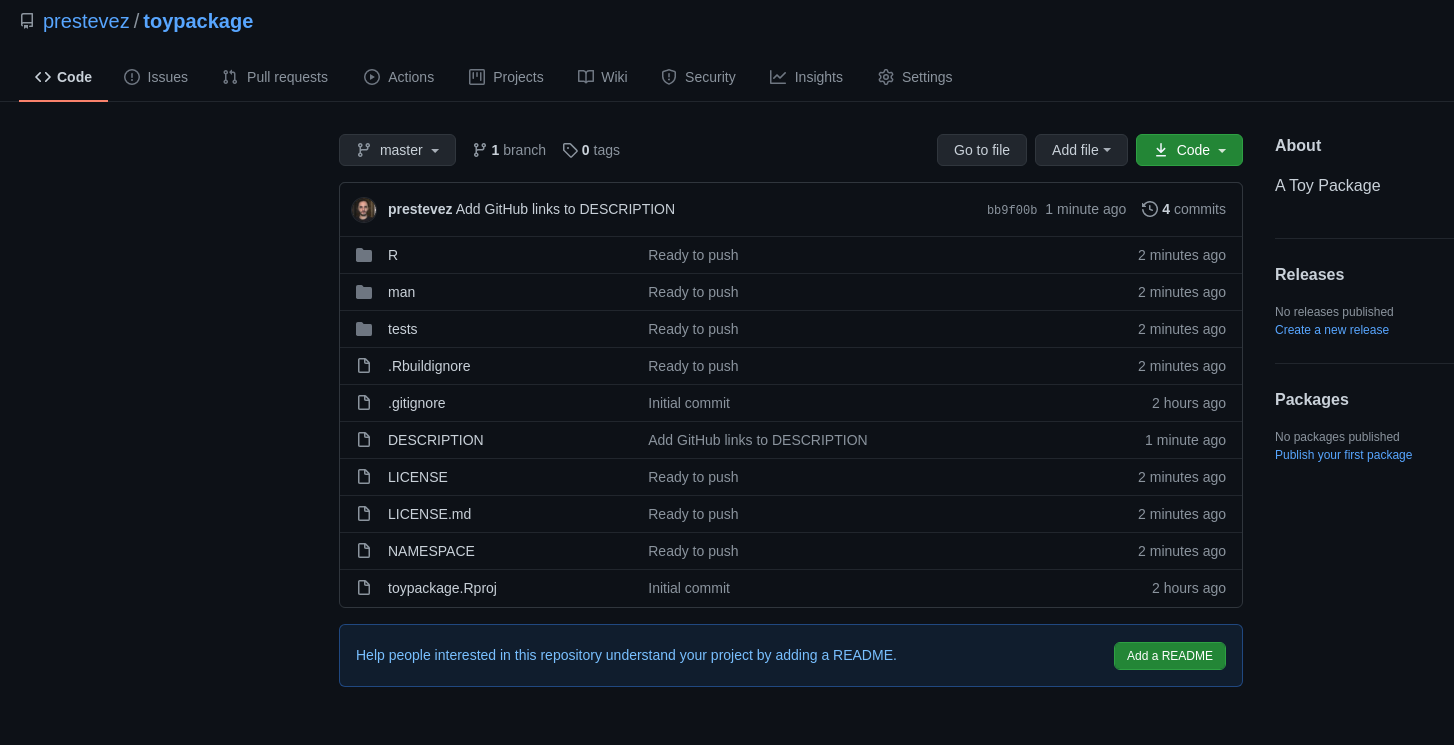
You will be asked if it’s OK to commit the DESCRIPTION file, go ahead and say yes. Once the changes are pushed to Github, a browser window will open with your package.
We are almost done, I promise.
Next we will create a README file so that visitors to your Github repo know what your package is about. Github README files are written using Markdown, and while you could write it yourself, you can use the use_readme_rmd to make it easier.
use_readme_rmd()
Since we are working with R, the use_readme_rmd function creates an Rmarkdown file which combines regular text with R code that can be compiled automatically into a document.
Edit the readme Rmarkdown file so that it looks like this:

Now build the ‘regular’ markdown README.
build_readme()
Commit and push the changes you made and visit your Github repository, it should look like this: prestevez/toypackage.
This package can now be installed from anywhere in the world using this command:
library(devtools)

install_github("prestevez/toypackage")
Congratulations!
You have just made and published your first R package.
What will you build next?
ALT: A scene from Toy Story, Buzz and Woody flying (i.e. falling with style), while Woody yells: "To infinity and beyond!" via GIPHY
Patricio R Estévez-Soto
Lecturer in Security and Crime Science
My research is focused on crime in Latin America and the Caribbean, spanning topics such as organised crime, repeat victimisation, quantitative criminology, crime prevention, and the nexus between crime and public policy.